Monday 12 December 2011

Quilled Bouquet

Hi friends
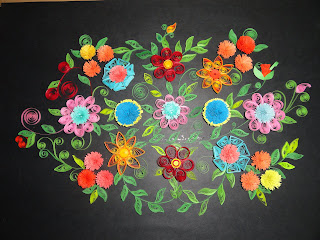
I realized its high time to re-emerge to my blog.I was away for quiet long.Meanwhile work didn't stop.I have a quilled bouquet to share with you.This was made for a very special person.


The fine details can be seen below.


The frame for the bouquet was made using double shaded quilling strips.The ribbon is made from foam paper.

Saturday 1 October 2011

Back to Cardmaking

Hello everyone,
September is always a special month.I have most of my friends and relatives born in this ninth month.This means more imagination and fantasy at work.One such piece is below.Its made in a bright yellow color to attract attention.


The card stock used here is celebrations.Well a wise choice is to use colors that complement your card stock.Since I choose red for the flower template,I thought of using blue to feed the corners.It turned out well.I also wanted to include a butterfly but its positioning was a bit confusing.So finally an idea struck me that it can be displayed as flying over the flower.Hope you all would like it!!!

I have another one in the craft basket.This one was made for a special person.This was again born out of my love for yellow color.The card in itself involves a quilled frame with some glitter stones at the bottom.The butterfly in the center is made by punching and pasting 3 heart shaped cuts.


You may wonder why I end up using these glitter stones all the time.But its just that I love using them and I feel they add shine to my ideas.

Well the most innovative attempt so far was a card made for my younger brother.It was his birthday and I presented my heartiest greetings and wishes in this card.


Again those stones came  to my rescue.This time I used them to write his name.
He liked it a lot (he claimed so ;)  ).

Hope you all would like them.Please follow my blog and leave a comment.Thank you all!!!!

Sunday 24 July 2011

Quilled Paintings

The real work begins here!!!
I planned to make some paintings for my family members and friends.Here are some attempts.


This is how it looks after framing.


Some more of them are displayed below.


Thank you for watching.

Quilled Earthen Pot

Well folks this has been one of my personal favorite so far!!
I experimented with quilling.I tried sticking a paper piece to a painted earthen pot and there it was.Wow!!I am done.So here have a look.


So begin by thinking of a design.Next soak your pot overnight in a bucket of water.Next morning dry it up in sun and paint it as per choice.Its better to choose dark colors so that every quilled piece is reflected well.Please give it a one day time to dry up.You need to use any oil base paint for this.Next prepare a design to be put up on the pot.Ensure that you don't pick thin pieces because chances are that they would loosen up and end up nowhere.Choose hues of red,blue,green,yellow to make it bright. Finally after you are done with pasting let it dry for a day or two.You may doubt that the normal glue wouldn't aid in sticking but it is the only thing that I have used to establish this.So get in all your earthen vases and pots and pamper them!!!


Back to creative me

Hi all,
I realized that I was gone for a really long time.So I am back with lot of experiments.I gifted this card to one of my close friend.

This can be very easy to prepare.You need to choose a base color which is pink in this case and a suitable patterned paper or cardstock.Next you decide the card orientation whether it opens horizontally or vertically.Now you have to measure the dimensions of patterned paper and just stick it to the base.Ensure that all the ends are uniformly done.Next to make it a bit shiny add any lace or a border as per choice and there it is.Next you can even enhance the look by adding shiny stones,embellishments or buttons to your card.Now to  give it a final look just punch 2 butterflies and stick them wherever you want.Finally ensure that you are being generous while applying glue so that you card lands up nicely and is received with great warmth.
This is a tip that this card can be made in about 30 minutes and is as easy as ABC.

Saturday 7 May 2011

Mother's Day

She is the most loving person I could ever meet in my life.She gives me everything I need and I dont need.Because for her, I am always a child and never an adult.When its cold outside, she loads me with woollens so that I dont catch a chill.Further, she makes me drink litres of water to escape summer heat.She ensures that at every moment I am doing good and growing.She cares rarely for herself because all the time she is busy looking after all of us.She works truly hard and with utmost passion.She is none other than my own MOTHER.She is someone without whom this world would have no meaning to me.She carries me in her heart all the time.You give me all the warmth I need.

When I was baby,I just knew to cry.You taught me to eat and laugh.You were the first word I uttered.You gave me this speech.You taught me to differ right from wrong.I still remember that day when you had slapped me once for not eating a raw apple.I was demanding you to cut it for me.And just the moment you slapped me,you were also crying for being harsh to me.Such is your love.Even in adolescence,I would have heated arguments with you but I could never see you loving me less.You seemed to care even more.I also remember the way you dressed me so beautifully in my childhood.You took extra care that I looked pretty in my attire.I remember once you were awake till 1 AM when I participated in school annual day.You were busy making my green hat!!!

Maa do you remember when my class teacher had called up home to inform you that I have stood first.You didnt believe it first!!!That was one day I could feel that you are my strength.Do you remember in 6th grade,when I was struck with chickenpox during final exams.I had to appear for sanskrit exam.Mumma you would read out the book so many times until I could memorise the whole.I just owe those 97 marks to you.It was and it is always your efforts that have made me a top scorer.This reminds me of another habit of yours.Maa you used to ask me the answers I wrote in the exam when I returned home.Was it to ensure that I wrote correct or was is to ensure that I scored the best????I still dont know ;)
I find this one very funny but it just comforts me now.You kept a table napkin,a napkin to keep on my lap,a handkerchief pinned to my ID card and last one to wipe my wet hands.I wonder you pampered me like a princess.You would tailor my clothes which I find the best.You still have treasured my first garment I wore when I landed up here.
There are so many things I want to write here.But they better be between us than the world.One which I want to say is you are truly honoured and truly loved.You are always and I mean it,always my love.Whenever I am in pain or in jubilation,I utter your name from deep down.I dont have words for what you have given and done for me.Still I feel to express this to you.I dont write with much sophistication.Simply put-With my whole heart,I wish you a very happy mother's day.I know each day is mother's day but today is just one day when I should say this to you mother-"MUM I LOVE YOU.YOU ARE THE BEST".

There is a surprise for you.Actually by the time other's read this, it would have reached you.Its a greeting to express my love.Mum you are fond of handbags so here is a greeting purse for you.Its a purse and its a card.


Hope you would like it!!!Tome a cuidado mi madre hermosa :)

Sunday 1 May 2011

Quilled Card with crimped borders

I have designed a new card which involves quilling,crimping and punching.I shall brief the steps to prepare it.

First of all, take a blue A4 size sheet and fold it into half along the length.This shall serve as the base of the card.Next take yellow,orange,red and green quilling strips of 3mm thickness and length around 30 cm.Now quill the yellow strip and as you reach the end just paste it keeping it still on the quilling tool and paste one end of the orange strip over it and quill it to the end.This way you will have yellow at the centre and orange around it.Similarly,quill green strips to make leaves.You can also use any other color of your taste.

Just keep in mind that before making a choice, keep that colored strip on the base(blue sheet) and consider your selection.This way you can make your card really colorful and attractive.

Tuesday 15 March 2011

My first creation in the making...

I have just started quilling and this is my first attempt.It is still not complete and would post its final look very soon.Hope you would like it.The first picture is a card that I am making.The second displays some quilled pieces and quilling strips.The last one is the quilling tool used to roll the strips and make different objects.HAPPY QUILLING!!!
This blog is dedicated to my beautiful mother who taught me this and everything in the world.She stood by me through thick and thin.Whatever I am today is all because of her undying efforts and her love.Mumma I love you so much...............

Template by:

Free Blog Templates